SPROUTS AND SHOOTS
 Many beans and seeds may easily be sprouted indoors.
In sprouting, seeds soaked in water begin to germinate and produce a sprout, a young growth.
In growing shoots, the seeds are planted in soil and their young greens are eaten, being at their nutritional peak.
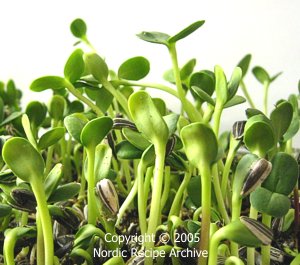
In picture on right: sunflower shoots.
Warning: since many seeds and sprouts contain enterobacteriaceae, some strains of which may cause potentially fatal food poisonings (eg certain E. coli and Salmonella strains), it is recommended by various food safety authorities for consumers to refer to the various national food safety agencies for specific guidance on sprouts when handling and consuming them.
Sprouts contain many essential nutrients, like vitamins and minerals, as well as proteins and fibre.
Growing your own sprouts and shoots takes very little effort and space. You will only need to remember to provide the adequate moisture, by either rinsing or sprinkling the seeds with water.
For growing shoots, besides the seeds, you will only need a suitable dish, like a wide, shallow tray (preferably with drainage), some clean soil and water.
Special soilless planting pads and blankets for growing shoots are also available. These are easier and less messy to use since no soil is needed.
For sprouting seeds or beans, you will need a container, like a large glass jar, a small piece of coarse-meshed netting, cheesecloth or other loose-weaved fabric, a strong rubber band and water.
Special sprouter containers are also available.
Seeds and beans:
When buying various seeds, ensure that they are fresh, preferably organic, and intended for sprouting or human consumption rather than sowing, as these may have been treated with chemicals. Most seeds keep for a year stored in a cool dry place. Only use clean, certified seeds to prevent potentially fatal salmonella or E. coli contamination.
Suitable seeds may be found in natural food stores.
Soil:
You can use any sterile bagged soil, compost or potting mix or special soilless planting pads. Just ensure that the growing medium is free of artificial fertilizers and chemicals.
Also use clean trays or pots for soil sprouting.
Containers and other equipment:
Keeping high sanitary conditions is very important in sprouting and growing shoots. Whether you are using a regular jam jar or a special sprouter container, always see that they are thoroughly clean. This applies to all the other equipment as well. You can rinse fabrics like cheesecloth with boiling hot water. Also wash your hands before handling sprouting seeds.
 Young, green shoots are cut, rinsed and eaten fresh as soon as they have grown to a specific height. The sprouted seeds and beans, after having reached their optimum growth, are rinsed and eaten fresh or briefly cooked.
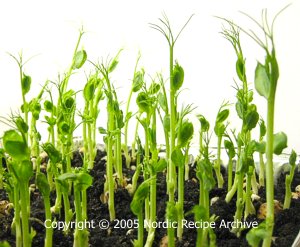
In picture on right: green pea shoots.
They may be stored in refrigerator for up to 3 - 5 days.
Use shoots or sprouts added to salads and stir-fries, in sandwiches, soups, dips and sauces.
Below you will find instructions for growing sunflower shoots, green pea shoots and mung bean sprouts.
Other seeds and beans that are easy to sprout are alfalfa seeds, regular green (brown) lentils, small French lentils, chickpeas and soybeans.
| Time schedule for growing sprouts |
| Seed type | Soaking time | Germination time | Sprout length | Storing time
(refrigerated) |
| Alfalfa | 4 - 6 hours | 4 - 6 days | 2 - 5 cm | Up to 1 week |
| Chickpea * | 12 - 24 hours | 2 - 3 days | 1 - 2 cm | Up to 2 - 3 days |
| Lentil | 12 hours | 3 days | ½ - 2 cm | Up to 2 - 3 days |
| Mung bean | 12 - 15 hours | 2 - 4 days | ½ - 3 cm | Up to 2 - 3 days |
| Soybean * | 12 - 24 hours | 3 - 5 days | 2 - 4 cm | Up to 2 - 3 days |
| * = sprouted beans must be boiled for 5 - 10 minutes before consuming |
| Time schedule for growing shoots |
| Seed type | Soaking time | (Pre-sprouting time) | Growing time | Shoot length |
| Sunflower | 12 - 18 hours | - | 1 - 2 weeks | 5 - 10 cm |
| Green pea | 24 hours | (1 - 2 days) | 1 - 4 weeks | 7 - 15 cm |
Many legumes contain anti-nutrients such as enzyme inhibitors. These substances bind enzymes or nutrients and inhibit the absorption of them by the human body. However, when legumes are properly soaked and germinated or cooked, the anti-nutritional factors are greatly decreased to insignificant levels, and also the nutritive value of the legume is increased.
Soaking alone significantly decreases the anti-nutrients, as they are leached into the soaking water. This is also why the soaking water must never be consumed or used for cooking.
Sprouted beans of large size, like chickpeas and soybeans, must be boiled for 5 - 10 minutes before consuming in order to break down the harmful substances they contain.
In addition, as many seeds and sprouts contain high amounts of enterobacteriaceae, most of which are harmless to humans but could include potentially dangerous strains (like some of Escherichia coli and Salmonella), many food safety authorities recommend consumers to cook all kinds of sprouts or sprouted seeds thoroughly before consumption to diminish the risk of contamination.
 SUNFLOWER SHOOTS
The sturdy sunflower shoots are crisp and have a nutty, slightly sharp taste.
whole (unshelled) sunflower seeds *)
clean soil
1. Soaking:
- Measure about 100 millilitres of dry sunflower seeds per 600 square centimetre surface area (for example a 20 × 30 cm wide shallow dish).
- Rinse the seeds thoroughly with plenty of cold water. Drain and place the seeds in a bowl. Cover them with plenty of cool water (about 15 - 20 °C). Measure at least 300 millilitres of water for every 100 millilitres of seeds. Since the sunflower seeds are very light and float atop the water, use a plate, a bowl or some other weight to weigh them down.
- Soak the seeds for about 12 - 18 hours at cool room temperature. Pour out the water and drain the seeds. Note: the soaking water must never be consumed or used in cooking, always discard it.
2. Sowing:
- Spread about 2 centimetres of lightly moistened, clean soil in a wide, shallow dish.
- Sow the seeds immediately after soaking by spreading them evenly on the soil surface. You may cover them with a very light layer of soil.
- Water the soil moderately, especially if there is no drainage in the bottom of the growing dish.
- Cover the dish with a piece of plastic to prevent the seeds from drying out. Leave one side slightly loose to ensure ventilation. Ensuring air circulation prevents fungal problems and mould formation. The plastic cover may also be perforated.
3. Growing:
- Place the growing dish in a dark, moderately warm and humid place or cover the plastic with a piece of newspaper etc. The seeds are kept in dark until the first shoots have emerged.
- Keep the seeds moist, preferably spraying them with a hand sprayer or by watering them lightly once or twice a day. The growing conditions must be neither too wet nor too dry. During this time, the seeds start to grow roots and bury them in the soil.
- As soon as the first shoots start emerging, remove the covering and bring the dish in the light. Avoid too hot, direct sunlight, though. Spray or water the soil to keep it moist.
- When the shoots are about 5 - 10 cm tall, they are ready to be eaten. Use them before they have grown too old and tough. Depending on the quality of the seeds, it may take about five days for up to two weeks for the shoots to reach the desired length.
4. Use:
- Cut the shoots near the root using scissors. Some of the hulls of the seeds will be attached to the shoot leaves. Most of them will fall off and the rest may be brushed off or picked out by hand.
Sunflower shoots cut only once.
- Rinse the cut shoots briefly with cold water. Drain on paper towel and enjoy fresh.
*) I use regular, unshelled sunflower seeds sold as bird feed.
 GREEN PEA SHOOTS
The decorative green pea shoots are tender and delicate with a mild, refreshing taste, resembling fresh peas.
dried green peas **)
clean soil
(large, (about 2 - 3 litre) glass jar with a wide mouth)
(piece of clean cheesecloth or nylon mesh)
(strong rubber band)
1. Soaking:
- Measure about 100 millilitres of dry peas per 600 square centimetre surface area (for example a 20 × 30 cm wide shallow dish).
- Rinse the peas thoroughly with plenty of cold water. Drain and place the peas in a bowl. Cover them with plenty of warm water (about 60 °C +). Measure at least 300 millilitres of water for every 100 millilitres of peas.
- Soak the peas for at least 24 hours at cool room temperature. Pour out the water and drain the peas. Note: the soaking water must never be consumed or used in cooking, always discard it.
 |
 |
 |
| Dry green peas |
|
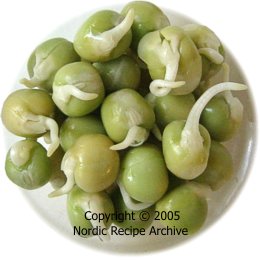
Soaked, pre-sprouted
green peas |
2. Pre-sprouting:
To speed up the growth of shoots, green peas may be pre-sprouted before sowing. This also helps to eliminate the peas that will not sprout.
This step may be omitted. In that case, move on to point 3 below.
- Place the soaked, rinsed and drained peas inside the clean glass jar (or use a special sprouter container and follow its instructions).
- Cover the mouth of the jar with the cheesecloth or mesh, securing it tightly over the jar's rim with the rubber band. The cloth will allow air to circulate in the jar and the excess water to drain out.
- Place the jar, turned upside down with the cloth-covered mouth facing down, in a dark place, like inside an airing cupboard. Prop the jar so that it will hold itself in a slanted position, at 45 - 60 degrees. This allows all the water to drain out of the jar. You can also place the jar on a countertop dish drainer etc, and cover it with a towel to keep it in dark.
- Twice or thrice a day, fill the jar with cool water through the cheesecloth or mesh. Swirl the peas and drain. Place the jar back in the slanted position.
- Make sure the peas do not cover the jar's mouth entirely, but there is always enough space for the water to drip out and air to circulate.
- Pre-sprout the peas for 24 - 48 hours, rinsing and draining regularly. As soon as most of the peas have sprouted tiny roots, you may sow them.
3. Sowing:
- Spread about 2 centimetres of lightly moistened, clean soil in a wide, shallow dish.
- Sow the peas immediately after soaking (and pre-sprouting) by pressing them gently and evenly in the soil. Cover them with a light layer of soil.
- Water the soil moderately, especially if there is no drainage in the bottom of the growing dish.
- Cover the dish with a piece of plastic to prevent the peas from drying out. Leave one side slightly loose to ensure ventilation. Ensuring air circulation prevents fungal problems and mould formation. The plastic cover may also be perforated.
4. Growing:
- Place the growing dish in a dark, moderately warm and humid place or cover the plastic with a piece of newspaper etc. The peas are kept in dark until the first shoots have emerged.
- Keep the peas moist, preferably spraying them with a hand sprayer or by watering them lightly once or twice a day. The growing conditions must be neither too wet nor too dry. During this time, the peas bury their roots in the soil and start to grow shoots.
- As soon as the first shoots start emerging, remove the covering and bring the dish in the light. Avoid too hot, direct sunlight, though. Spray or water the soil to keep it moist.
- When the shoots are about 7 - 15 cm tall, they are ready to be eaten. Use them before they have grown too old and tough. Depending on the quality of the peas (and the possible pre-sprouting period), it may take from one to four weeks for the shoots to reach the desired length.
5. Use:
- Cut the shoots near the root using scissors. Green pea shoots cut only once.
- Rinse the cut shoots briefly with cold water. Drain on paper towel and enjoy fresh.
**) I use regular dried green peas sold in Finnish grocery stores, mostly used to cook the traditional Finnish green pea soup.
 MUNG BEAN SPROUTS
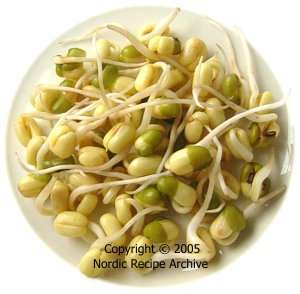
Mung bean sprouts are very crisp. They may be used fresh or added to hot dishes.
dried mung beans ***)
large, (about 2 - 3 litre) glass jar with a wide mouth
piece of clean cheesecloth or nylon mesh
strong rubber band
1. Soaking:
- Rinse the beans thoroughly with plenty of cold water. Remove any discoloured or damaged beans. Drain and place the beans in a bowl. Cover them with plenty of hot water (about 80 °C +). Soaking in hot water will help to soften even the harder beans. Measure at least 300 millilitres of water for every 100 millilitres of beans.
- Soak the beans for at least 12 hours at cool room temperature. Pour out the water and drain the beans. Note: the soaking water must never be consumed or used in cooking, always discard it.
2. Sprouting:
- Place the drained beans inside the clean glass jar (or use a special sprouter container and follow its instructions).
- Cover the mouth of the jar with the cheesecloth or mesh, securing it tightly over the jar's rim with the rubber band. The cloth will allow air to circulate in the jar and the excess water to drain out.
- Place the jar, turned upside down with the cloth-covered mouth facing down, in a dark place, like inside an airing cupboard. Prop the jar so that it will hold itself in a slanted position, at 45 - 60 degrees. This allows all the water to drain out of the jar. You can also place the jar on a countertop dish drainer etc, and cover it with a towel to keep it in dark.
- Thrice a day, fill the jar with cool water through the cheesecloth or mesh. Swirl the beans and drain. Place the jar back in the slanted position.
- Make sure the beans do not cover the jar's mouth entirely, but there is always enough space for the water to drip out and air to circulate.
- Sprout the beans for about two to four days, rinsing and draining regularly. As soon as the beans have sprouts about 1 - 3 cm long, they are ready to use.
- Before eating, you may place the sprouting container in light for two hours. This will activate the chlorophyll in the plant, also turning the sprouts greener.
3. Use and storage:
- Rinse the bean shoots and drain thoroughly. Store them loosely wrapped in refrigerator at a temperature lower than +6 °C for up to 2 - 3 days. Avoid using plastic bags or other tightly sealed containers in storing, as this may cause mould to form. You may continue rinsing and draining the bean sprouts once a day.
- Enjoy the bean sprouts fresh or heated, like added to stir-fries.
Note that many food safety authorities recommend all types of sprouts to be thoroughly cooked before consumption to diminish the risk of possibly fatal salmonella or E. coli contamination.
Note: if during sprouting or storage the beans and sprouts develop mould, you must discard the whole batch. To prevent mould formation, always make sure that the utensils you are using, as well as your hands, are clean. Rinse the sprouts frequently and let them drain thoroughly. The sprouting environment must not be too warm (about 22 °C).
***) I sprout about 200 millilitres of dried mung beans inside a three-litre glass jar.
Recipe source: instructions gained from various sources.

 Many beans and seeds may easily be sprouted indoors.
 Young, green shoots are cut, rinsed and eaten fresh as soon as they have grown to a specific height. The sprouted seeds and beans, after having reached their optimum growth, are rinsed and eaten fresh or briefly cooked.


